Upgrading the Ender 3 V2 with auto Z calibration (and Klackender beta)
If you have a bed probe on your 3D printer, you know that you need to get the right vertical (Z) offset from the nozzle to the probe for it to work properly. If you switch nozzles, you know you need to repeat this, and it can be pretty tedious. Thankfully there's a way to automate this whole process, using the Klipper Z-calibration script, which does the following three steps:
- Probes a switch with the nozzle
- Probes the same switch with the bed probe, to tell the difference between the two
- Probes the bed to get the actual point at which Z is 0
This has been made to work with the Ender 3, but the documentation seems to be both fairly lacking and also largely contained in a difficult to search Discord thread on KevinAkaSam's sandbox. Here I'm attempting to document what I did and what tripped me up along the way. I'm assuming a decent baseline understanding of how 3D printers work and experience with doing mods, beginners will likely get lost here. This is not an authoritative source of documentation, just what I found along the way when doing it myself.
Update since I first wrote this post, I've now updated my configuration. Now I have the Z calibration run after both mesh calibration, and the nozzle warming up. This has two or three benefits:
- The centre point is defined as being the zero reference point of the mesh, which is important for adaptive meshes
- Having the nozzle heated means that any filament left on there gets squished when the probing is done, meaning little to no error on the offset reading (as long as it doesn't just get transferred to the bolt)
- Depending on how much thermal expansion actually plays a part in your nozzle offset, this is now calibrated for it at temperature
Background
My setup consists of an Ender 3 V2, with the following mods before starting this process:
- Klackender, old-style
- Micro Swiss NG Revo hotend
- Belt-driven Z axis
- Replacement Y carriage
- Klipper flashed on a BTT SKR Mini v3
(I considered making affiliate accounts to link to the products above in the vague hope I might make 20p off it, but the links are clean. Feel free to hire me as compensation instead.)
I think the only necessary part of this is running Klipper. You don't need a replacement board to do it, but you do need a separate computer (e.g. a Raspberry Pi) to run Klipper on, and there are plenty of guides to getting going with that so I won't cover it here. You do also obviously need some kind of bed probe, and the calibration script does assume you're using something Klicky-based, but I think it could work with anything that involves physically touching the bed.
If you have a replacement Y carriage, it may pose an issue if it doesn't have the same rough layout as the stock one, but mine was fine.
Klackender beta detour
I like Klackender, it's a very cheap and simple system for a bed probe, but it is also precise and reliable, certainly compared to my BLTouch once I started having weird issues with it. I did, however, have issues where the probe would sometimes fail to dock straight, and would then be knocked off. When I actually started paying attention to KevinAkaSam's Discord, when I was converting my printer's Z axis to be belt driven, I noticed the #klack-beta channel existed and had a “new” design (from several years ago, it actually existed when I first set up Klackender but I had no idea) that cuts down the size of the probe block, and makes the dock more reliable. I would very much recommend using the beta if you're planning on moving over to Klackender, and the files were recently added to GitHub so you don't need to join the Discord to get them. Hooray! Installation/assembly is basically the same as the non-beta version.
If you, like me, have a Micro Swiss NG extruder, you can use the old style modified probe mount along with my brutal mod to the dock to have it work.
Setting up the Auto Z calibration
There are three parts here: setting up the hardware, configuring the software, then doing some calibration.
Hardware
Again this gets broken down into two pieces; the Voron Z endstop (sexbolt), and the Ender 3-specific parts. There is also a version of the Ender 3-specific parts from KevinAkaSam, which mounts on the X axis instead and uses a different switch setup, but that's in the Discord and not what I used.
For the endstop, I bought a kit from Aliexpress and replaced the microswich it came with with an Omron D2F. If you're doing this mod, you probably want the consistency of a brand name microswitch.
For the Ender 3-specific parts, I printed out the bolt-on version from the GitHub repository, using the “stockE3” variants. I picked the bolt-on version because it seemed like it would be more robust, and it has a space to put a nozzle wipe in, which feels important for getting the right Z offset. Anyway, it turns out this was a mistake, because there's an Ender 3 V2 version in a pinned message in the KevinAkaSam Discord thread. I appreciate that this is work done for free and there's no obligation to do anything, but I maintain that Discord is the worst place to share instructions and files. Even having searched a whole load in the thread for various answers to questions, I only found this out when I'd already assembled all the hardware and was looking for how to configure the software side, basically meaning that for me the work may as well not have been done at all. Unfortunately I don't feel comfortable resharing files that don't have an explicit licence attached to the, so you'll have to join if you want to find them, but at least you know they exist. Anyway, this digression aside, this meant I had to trim a little bit off the mount to avoid it running into the Y limit switch housing.
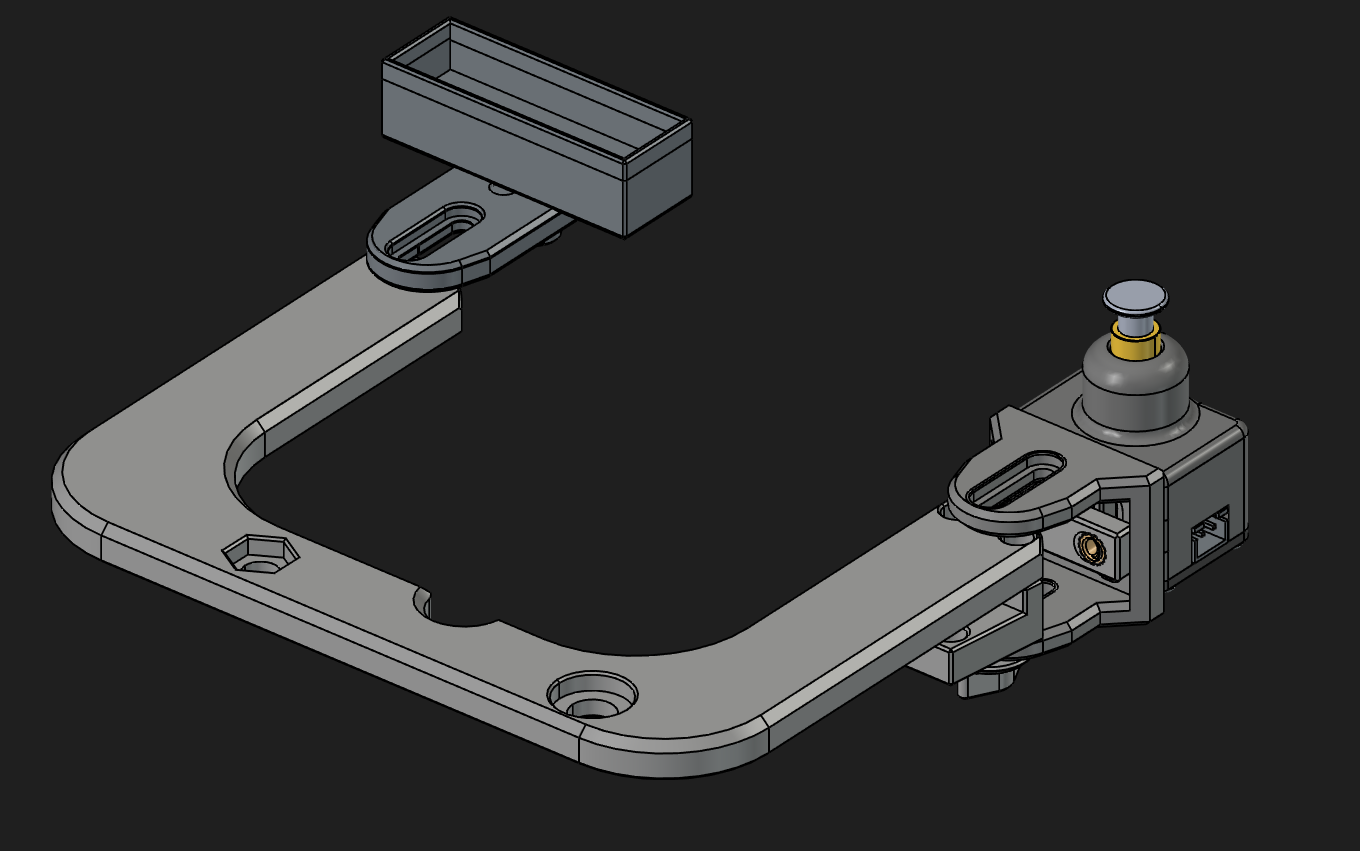
For seeing how the parts are meant to go together, I recommend looking at the relevant .step file using something like FreeCAD. This will also show you where heatset inserts are required, e.g. where the Z endstop is screwed into (yellow in the screenshot below). It won't show you where or what bolts are needed, but I found trying various M3 bolts would get me something that would work.
I found positioning the actual endstop to be slightly tricky, and I definitely mounted it ridiculously high, at about 8mm above the bed surface with a normal bed. Still, I don't think it matters too much, as long as the nozzle and probe can hit the endstop, and the endstop housing doesn't slip down when it is hit. A bit of bending is, I think, unavoidable but also not a problem.
You will probably need to cut away some of the top of the Y tensioner (at the front of the printer) to allow the Y carriage to move far enough forwards to let the nozzle hit the switch. I got a bit confused at this point and thought I needed to be able to move fowards even further to be able to hit the switch with my probe, but no, the probe is behind the nozzle which means that the bed also moves backwards to line up the switch with it. I don't know why this caught me out, but it did.
Finally, you'll need to plug the endstop into an arbitrary I/O pin you have free on your board, and to ground. Hopefully you have some spare, I think people often use the bed probe pins since they have their Klackenders wired up to the Z endstop pins.
Software
You need to install the Z calibration script. The wiki has a few options. It also documents the configuration steps pretty well, so I won't go into too much detail here.
You will need to increase position_max in your stepper_y section to be able to hit the endstop. I recommend setting it to, say, 240, then going to 235 and nudging it forward by 1mm at a time until the wheels can't go any further. Once you do this you can figure out the X and Y values needed to hit the switch with the nozzle.
One thing that I struggled to figure out is how the Z endstop pin is configured. Well, turns out you configure the Z endstop as the Z endstop. This probably means you will need to update some other parts of your Klipper config. I suspect that using the proper Klicky macros avoids this, but I'm using basic Klackender ones, and so I had to update:
- Changing the Z endstop to be a real pin, instead of
probe:z_virtual_endstop - Adding a
position_endstopthat roughly corresponded to where it actually is in relation to the bed - Temporarily adjusting
position_minas I was going through the process of figuring out what height the endstop is actually at - Re-adjusting my
homing_overrideto use the new endstop. This is very important! If you don't do this, you'll have the nozzle slowly crash into the middle of your bed and not stop.
My homing_override now looks like this:
[homing_override]
set_position_z:0 # Make printer think Z axis is at zero, so we can force a move upwards away from build plate
gcode:
  G90
  G1 Z10 F3000 ; move up to prevent accidentally scratching build plate
  G28 X
  G28 Y
  G1 X173 Y238 F6000
  G28 Z
  G1 Z10 F3000
  G1 X0 Y0 F6000
In the above, X173 and Y238 are the values needed to hit the switch with the nozzle.
For completeness, here's my z_calibration section:
[z_calibration]
nozzle_xy_position: 173,238
switch_xy_offsets: -5,-20
#bed_xy_position: 117.5,117.5 # I removed this and instead only calibrate Z after running a mesh calibration
switch_offset: 0.091
start_gcode: probe_out
end_gcode: probe_in
offset_margins: -1.8,-0.3
Calibration
I don't think I need to go into any detail here, just acknowledging that you probably do want to alter the switch_offset configuration value via the calibration. I recommend getting feeler gauges to get a good level of precision on your adjustments.
Conclusion
Hopefully this is actually useful to some people. I know it would have been to me. This was a very worthwhile mod once I got it working, since I have a quick-change Revo system but swapping nozzles was always a pain with them needing ever so slightly different offsets from each other.
I didn't cover the nozzle brush here, but that's because what I have at the moment is terrible and I need to figure out a good solution.
If you did find this useful, or have suggestions for changes, it would be nice to hear from you on the fediverse.