Replacing the Lumintop B01's battery spring
The light
I have a Lumintop B01 front light for my bike. It's quite nice; it's pretty bright, it runs on 21700 cells (inb4 “that's a lot of cells”), the light it puts out isn't a horrible cold colour temperature, and its beam is formed so it has a cutoff to avoid blinding oncoming traffic. This does mean I also pair it with a helmet light (gaciron V20C(H)-600, I think the H just means it comes with the helmet mount, which I had to buy separately) both for redundancy, and to illuminate more of the environment. I only mention this because A) it came in handy when the B01 failed, and B) I might as well give a full picture of my front lighting situation, for completeness.
The problem
Recently on a ride, I noticed the light kept cutting out as I went over bumps. Eventually it stopped entirely, so I stopped riding and opened the battery compartment. I eventually noticed two things:
- The spring in the end cap was very warm
- The spring in the body seemed to have split, and the remnants of one of the parts was wedged in the end of the light, on the PCB
I'm pretty sure that these two things told me that:
- The light had been cutting out because there was no longer enough spring to reliably hold the battery in contact with the two terminals
- The light fully cut out because the broken off bit of spring was shorting the battery out between the rest of the positive spring, and the ring of exposed ground around the PCB. Which is... not ideal, and I'm glad I got to it reasonably quickly.
The fix
Note that this involves messing with something that takes unprotected lithium ion cells. Only follow this guide if you understand the potential risks and how to check for them, and are confident in your soldering work. Follow my path at your own risk, and all that.
At first I thought that, after removing the broken off bit of spring, I would have to just wedge something metal in the negative end to pad it out a bit to compensate for the missing spring, but that felt janky, and more importantly I couldn't find anything immediately to use.
Web searches came up with some people having had some issues with the springs breaking in some lights, and suggestions for how to replace them, but they didn't really go into enough detail for this specific light, and it didn't necessarily feel like they were totally applicable. Anyway, it turns out that they are applicable, it's just really, really difficult to do.
In order to get access to the light's PCB, you need to remove the tube that contains the battery from the head of the light. This feels like it won't happen. It will happen, but unless everyone else's is different to mine, you need some real leverage to get it off. What I ended up having to do was to use some Knipex pliers wrenches on the flat sides of the head, where the power button and the USB port are, and some Knipex Cobra water pump pliers on the tube, with some plastic in between to at least try to minimise the amount of damage it would do. Even with this leverage, it wasn't trivial to unscrew the tube. I did add some WD40, but I don't know how much this helped and it also meant I had to clean it off afterwards.
Once you get the tube off, it's trivial to get the PCB out. I think there is adhesive of some kind holding it in, but it's nowhere near as strong as for the tube. Desoldering the spring is not too difficult, but watch out for ripping the pad off – I think I managed to rip some small chunks out, but I did manage to avoid losing the connection to the rest of the components. I believe the spring is glued in some way in addition to being soldered – I highly recommend using hot air rather than repeating my mistakes and using a soldering iron for this, just be careful of all of the surface-mount components on the other side.
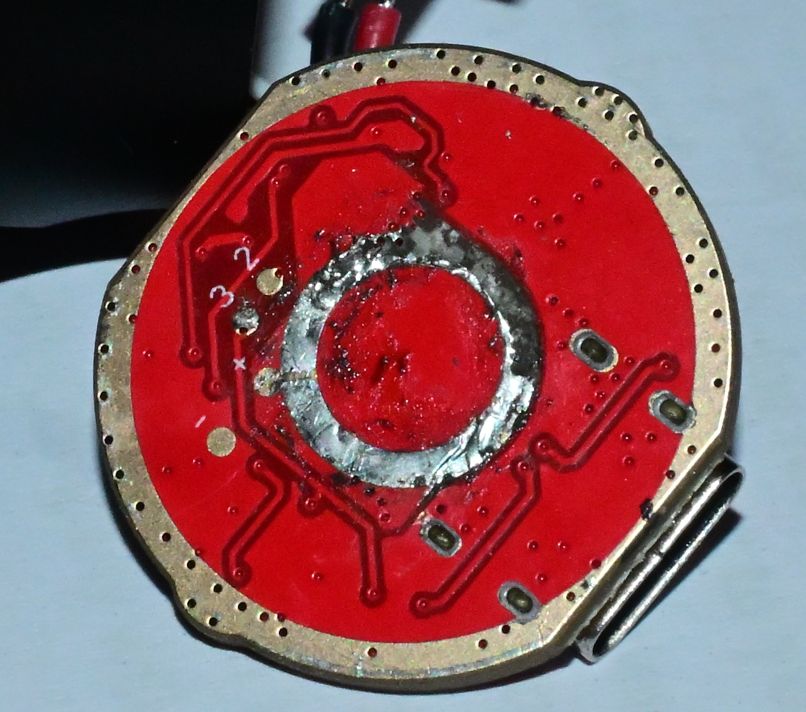 The rather shoddy desoldering job I did with an iron
For replacing the spring, you'll need a 9mm battery spring. I only managed to find them on AliExpress (I can't yet speak to the longevity of these particular ones), so it was a bit of a wait before I could find out if this would even work. Thankfully once they did arrive, they were the right size.
For attaching the spring to the central contact, I highly recommend hot air if at all possible. I tried using a soldering iron, thinking it would work out, but I didn't get a connection I was happy with, plus it was a bit off-centre. Reflowing it with hot air whilst pushing down on the spring gave me a result I was far happier with. Be careful not to get solder on the outer ring of the PCB – it needs to make contact with the body tube to provide the negative connection to the battery, so you want that to be as flat as possible. I got a little bit of solder on mine, but desoldering braid got it off to a good enough standard.
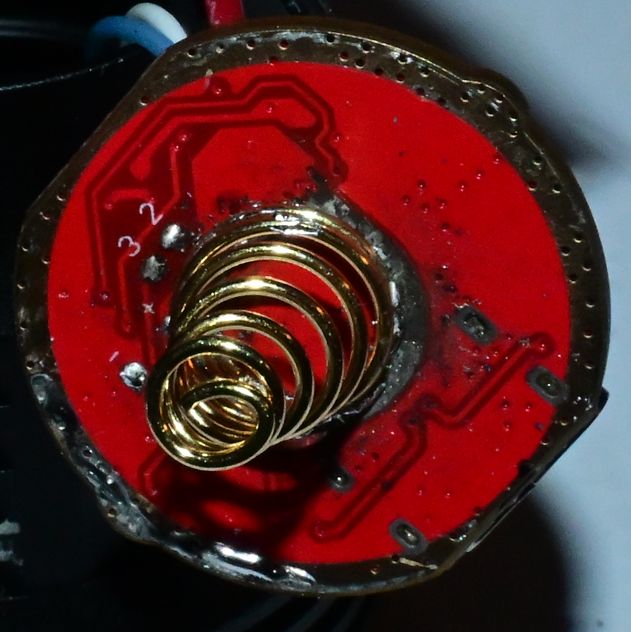 The off-centre first attempt at attaching the spring using a soldering iron
Once you've soldered it, it's worth checking you don't have a short between the spring and the surrounding ring, because that would be a Bad Thing, and it's also probably worth trying out the light just via USB to see if you've broken it. Once you're happy with the outcome, putting it back together is pretty much the inverse of taking it apart. Be aware that you do have to tighten the body tube up a fair bit for it to make a good contact with the PCB, so if it's not working, try tightening it more.